Introduction - Why Data Quality matters and the Great Expectations library
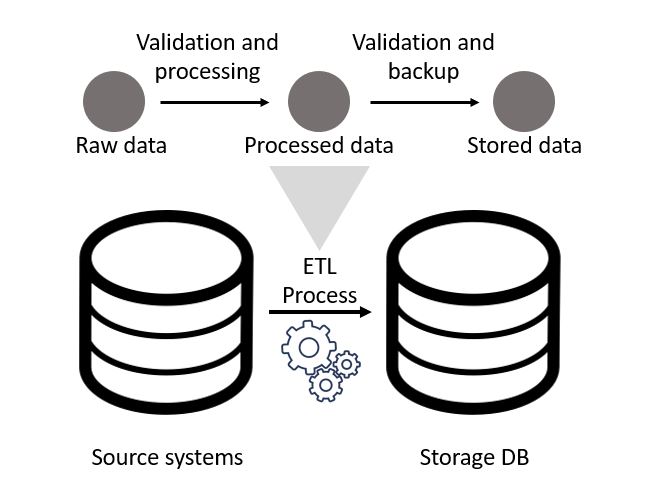
Over the last decade or so companies have been striving to make better use of their data. The use cases for such projects have generally fallen under two categories, improve operational efficiency or drive customer sales / behaviour. However, in order to utilise this data it must first be piped from source systems (CRM, ordering, POS etc) into somewhere with greater redundancy. In addition to this simpler goal, it must also be manipulated into a format that is acceptable to the people analysing said data!
The pipelines that complete these operations are often complex, incorporating numerous source systems with different schemas, update times etc. This leads to the development of numerous functions that work within an ETL flow, scheduled by a tool such as Prefect or Airflow.

So with the crucial nature of this data in mind, how do we ensure that what gets pulled though our flow is going to be of use to those at the end of the pipeline? That something hasn’t been misentered or corrupted in the source systems? Well in most software the role of unit / integration testing would help, however if your unit test expects a data frame and to return a dataframe, as a simple example, this may pass whilst the data within said dataframe is riddled with NULL values and bad quality data. As such, a good addition to more standard testing is to actually test what data those source systems are providing, such as in the example below, which is where a fairly recent library, Great Expectations (GE), can be a real help! (Though as is usually the case, other DQ testing libraries exist that can be explored, such as deequ and bulwark)
To summarise the library, GE works in addition to unit / integration testing by profiling data sources in order to build a set of “expectations” around each column based on the type, which can then be pruned / added to by the user. For example, on the dataframe shown below we have and ID column that you may expect to never be NULL, an Animal column that should always be a string and a cost that should always be a float.
import pandas as pd

df = pd.DataFrame(zip([1, 2, 3, 4, 5], ["Cat", "Dog", "Cat", "Rabbit", "Dog"], [70, 65.00, 120.50, 20.75, 1000.00]), columns = ["ID", "Animal", "Treatment_Cost"])

print(df)
## ID Animal Treatment_Cost
## 0 1 Cat 70.00
## 1 2 Dog 65.00
## 2 3 Cat 120.50
## 3 4 Rabbit 20.75
## 4 5 Dog 1000.00An example flow of a GE pipeline would involve initial profiling of data, adaption of the produced expectations and continual validation of new data against said expectations. In addition to a better understanding of the source and processed data, this process can help visualise it though auto generated html, which can be deployed as a static website. This nice addition allows the user to deploy a very quick data quality dashboard, an example of which from the package’s docs is shown below.

Getting started with GE on databricks
As eluded to in the title of this post, I’ve been utilising GE on the well known Spark platform Databricks, as we’ve been using this platform with a number of clients in order to do distributed computation of large datasets. However, whilst this post is based around Spark, GE can work with other datatypes such as CSVs (via Pandas Dataframes) and Relational Databases (via SQL Alchemy), as shown in their docs here.
So, in order to start using GE in DataBricks you must first follow the initialisation instructions on your local machine, after downloading from PyPy both locally and on your Databricks cluster. During set up choose option 1 regarding data sources and then 2 for pyspark, which will give you an error unless you have pyspark installed locally, however this doesnt matter. If you now check the directory you initiated within youll find a great_expectations folder and a great_expectations.yml file which you can open and edit. In this file add the following code, so that it matches the image shown below.
datasources:
  spark:
    class_name: SparkDFDatasource
    generators:
      passthrough:
        class_name: DatabricksTableBatchKwargsGenerator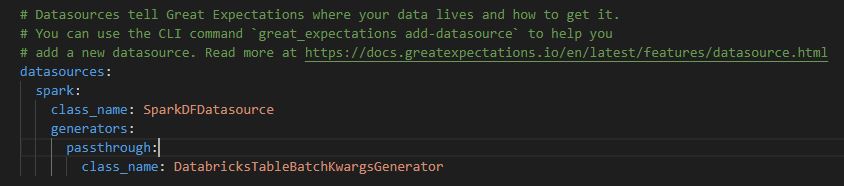
Once this is saved you can copy the local files over into the DataBricks File System (DBFS), using the DataBricks CLI, as shown below and documented here. This involves first making a directory in the DBFS and then copying over the files.
dbfs mkdirs your_ge_dir

#Note this \ is for Windows, change to / for linux
dbfs cp -r .\your_local_folder dbfs:/your_ge_dir
Once this is done you can check the files have copied by opening a notebook, and using the %fs cell magic to check the contents of your dbfs, using the below code.
%fs

ls your_new_dir/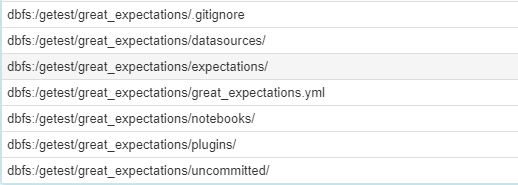
Now that you have the initilisation set up and the library on your cluster you can set your GE context (which tells the profiler what kind of data to expect) and set your initial expectations, which I’ll document in two different ways, manual profiling and full profiling, the latter involving the building of the above mentioned data docs.
Setting your expectations - Setup
To do either of the above mentioned methods there is a standard set up, which is shown below. This sets up your data context and builds a list of your data assets in a specific database.
#Loading the package and any additional elements, such as the basic profiler

import great_expectations as ge
from great_expectations.datasource.generator.databricks_generator import DatabricksTableBatchKwargsGenerator
from great_expectations.datasource.sparkdf_datasource import SparkDFDatasource
from great_expectations.dataset.sparkdf_dataset import SparkDFDataset
from great_expectations.profile.basic_dataset_profiler import BasicDatasetProfiler
import json

DATABASE = "database"

context = ge.data_context.DataContext("/dbfs/your_ge_dir/great_expectations/")

Datasource = SparkDFDatasource()

generator = DatabricksTableGenerator(name = 'default', datasource = Datasource, database = DATABASE)

data_asset_tuples = test.get_available_data_asset_names()["names"]

data_assets = [i[0] for i in data_asset_tuples]
Method 1: Manual Profiling
The first step to manual profiling is to load the required data, convert this to a GE recognisable spark dataframe object and then create an empty expectations file.
data = spark.table(database + "." + data_assets_paths[0])

spark_data = SparkDFDataset(data)

data_asset_name = data_assets_paths[0]

context.create_expectation_suite(data_asset_name, "Test")![]()
Once you have your empty file you can manually add in the relevant expectations for the desired columns, and profile the batch of data via the validation operator and save out the new expectation suite (in this scenario also saving any failed expectations).
spark_data.expect_column_values_to_not_be_null("PROJECT_ID")
spark_data.expect_column_values_to_be_in_set("DELIVERY_GROUP_LATEST", set(['IP Legacy', 'IP AM SP&C']))

spark_data.validate()

context.save_expectation_suite(discard_failed_expectations = False)
Method 2: Full Profiling
As opposed to manual profiling, full profiling utilises the inbuilt data profiler that is packaged with GE in order to build a full expectation suite based on the column types, and then validate the data against all of these expectations. A workflow for such a method might be to profile all the tables within a database, maintain these expectations and then validate any updates from the raw data that is appended to these tables. This example is what is shown below, which utilises a couple of custom functions which can be applied to each table within the data asset list created during set up.
# First build the functions to produce the expectations for the database and also
# to run the validations

def build_expectations(database, asset_name, context):

  exp_suite = database + "." + asset_name + "." + str(datetime.today().strftime("%d-%m-%Y")) + "_expectations"

  data = spark.table(database + "." + asset_name)

  spark_data = SparkDFDataset(data)

  context.create_expectation_suite(exp_suite, overwrite_existing = True)

  profile = spark_data.profile(BasicDatasetProfiler)

  context.save_expectation_suite(profile)

  sqlContext.uncacheTable(database + "." + asset_name)


def validate_expectations(database, asset_name, context):

  val_suite = database + "." + asset_name + "." + str(datetime.today().strftime("%d-%m-%Y")) + "_validation.json"

  data = spark.table(database + "." + asset_name)

  spark_data = SparkDFDataset(data)

  validation = spark_data.validate()

  val_json = json.loads(str(test))

  with open(f"/dbfs/getest/expectations{val_suite}", 'w') as f:
    json.dump(val_json, f)

  sqlContext.uncacheTable(database + "." + asset_name)
# Create the expectations and then validate, storing the results of the validation and updating the data docs
for i, j in zip(data_assets, data_assets_paths):
build_expectations(DATABASE, i, context)
for i, j in zip():
validate_expectations(DATABASE, i, context)The first function should produce an expectations file for each table, which can then be validated against to build a new data docs page. Examples of the json outputs from both functions are shown below.
![]()

Wrap up
So, hopefully this post has shown you a potential new way to more simply test the quality of what’s moving within your data pipeline, rather than just the functions that make it up! In addition to the enhanced testing that GE provides, I believe that the incorporation of the static Data Docs data quality pages could be a real help to organisations looking to quickly understand the quality of their data!