So, this is my first post in a long while, partly due to a busy summer and partly due to shifting jobs (which added to the busyness!). Since June I’ve been working as a data scientist / dev at a small, but rapidly growing, tech consultancy, which so far has lead to me learning tonnes of new skills and working on some interesting projects. It’s because of this jump that I can actually write this post, as one project was the automation of a very manual, local process through the use of the Azure platform. In short, the process involved collecting a number of data points from various sources, overlaying some analysis and pushing a number of enhanced data tables into a front end vis tool.
So without any more rambling I’ll go through the steps and technology we used in order to solve this problem.
Part 1: Framing the problems
I’ll keep this piece short since I’ve already alluded to the process in the intro, but an important step in any automation / ML / analytics project is to frame the problem and understand how best to solve it. Luckily for us this problem was somewhat simple in that it could be broken down into an Extract Transform Load (ETL) job, where the objective was to pull data, modify it then feed it back to the end consumer. There were a number of issues around accessing data from various sources, which should be explored before any project kicks off, but that’s not really the topic of this post.
Part 2: Drafting the architecture
In order to draft an outline architecture we first had to pick a provider, which based on discussions with the client ended up being azure, as they were looking to move into that direction later in the year anyway, so the move from a proof of concept into live would be less difficult.
![]()
Once a provider was chosen the next step is to sift though the enormous number of moving parts within the ecosystem for pieces that fit the specific use case. For us that involved azure blobs for storage, azure batch (which relies on Docker containers and as such an AZ / Dockerhub container registry) for processing and a generic SQL store for long term storage. These components were then all encompassed within a Virtual Network to limit the IP addresses which could access the data / processes. Additionally, all of these pieces were allocated an identical resource group, meaning billing could be easily tracked and the entire architecture could easily be taken down if needed.
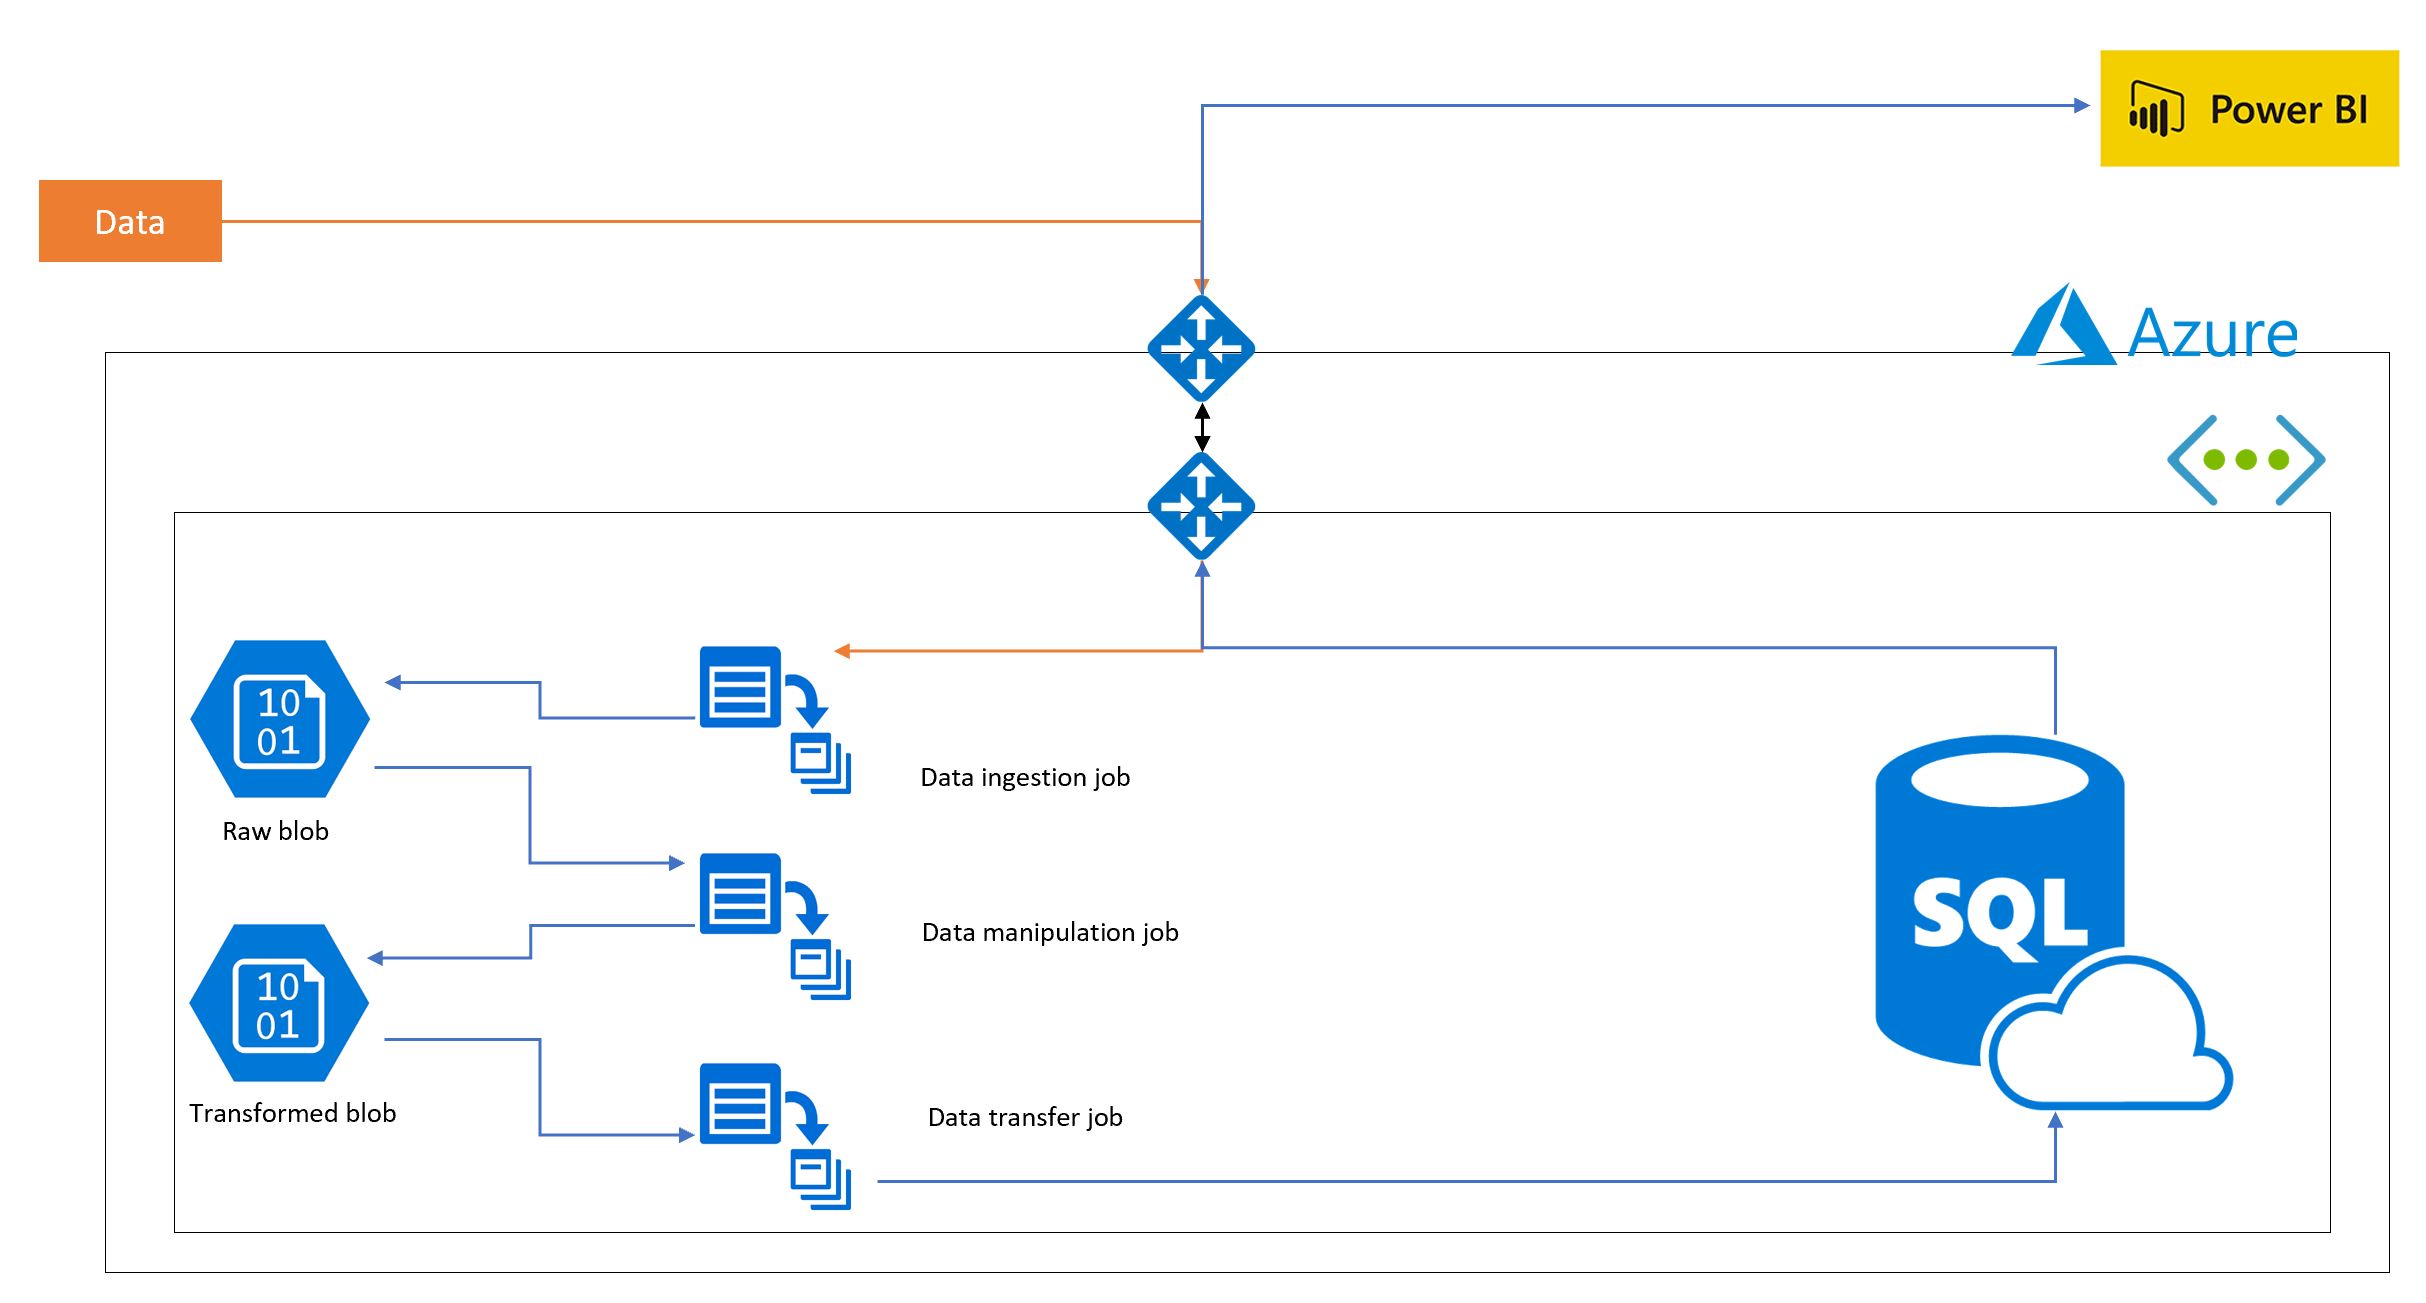
So, how do all these pieces stack together to form a working architecture? Well, this can be seen on the diagram below, where data is ingested, manipulated and loaded via a batch process (which are all chron scheduled), stored in a number of blobs based on the state of the data and ultimately uploaded into a SQL store which connects to a PowerBi front end.
Part 3: Building the pieces
So, moving onto actually building the individual pieces for the process. I wont go into the full details for each process here (such as functions to pull data from APIs etc), rather give a flavour of how to connect to the pieces of the architecture.
Blobs, VNET, container registry, keyvault and SQL store
So the first thing to do is to build the “non-moving” pieces of the puzzle, namely what will either provide security or hold the data in this case, for this project I went in the order Resource Group, VNET, Blob stores, Container Registry, keyvault and then SQL store. This can either be done using Azure Resource Management (ARM) templates (https://github.com/Azure/azure-quickstart-templates), which are similar to the cloud formation process in AWS. This allows you to construct the infrastructure using code, which can be helpful if you have multiple deployments.
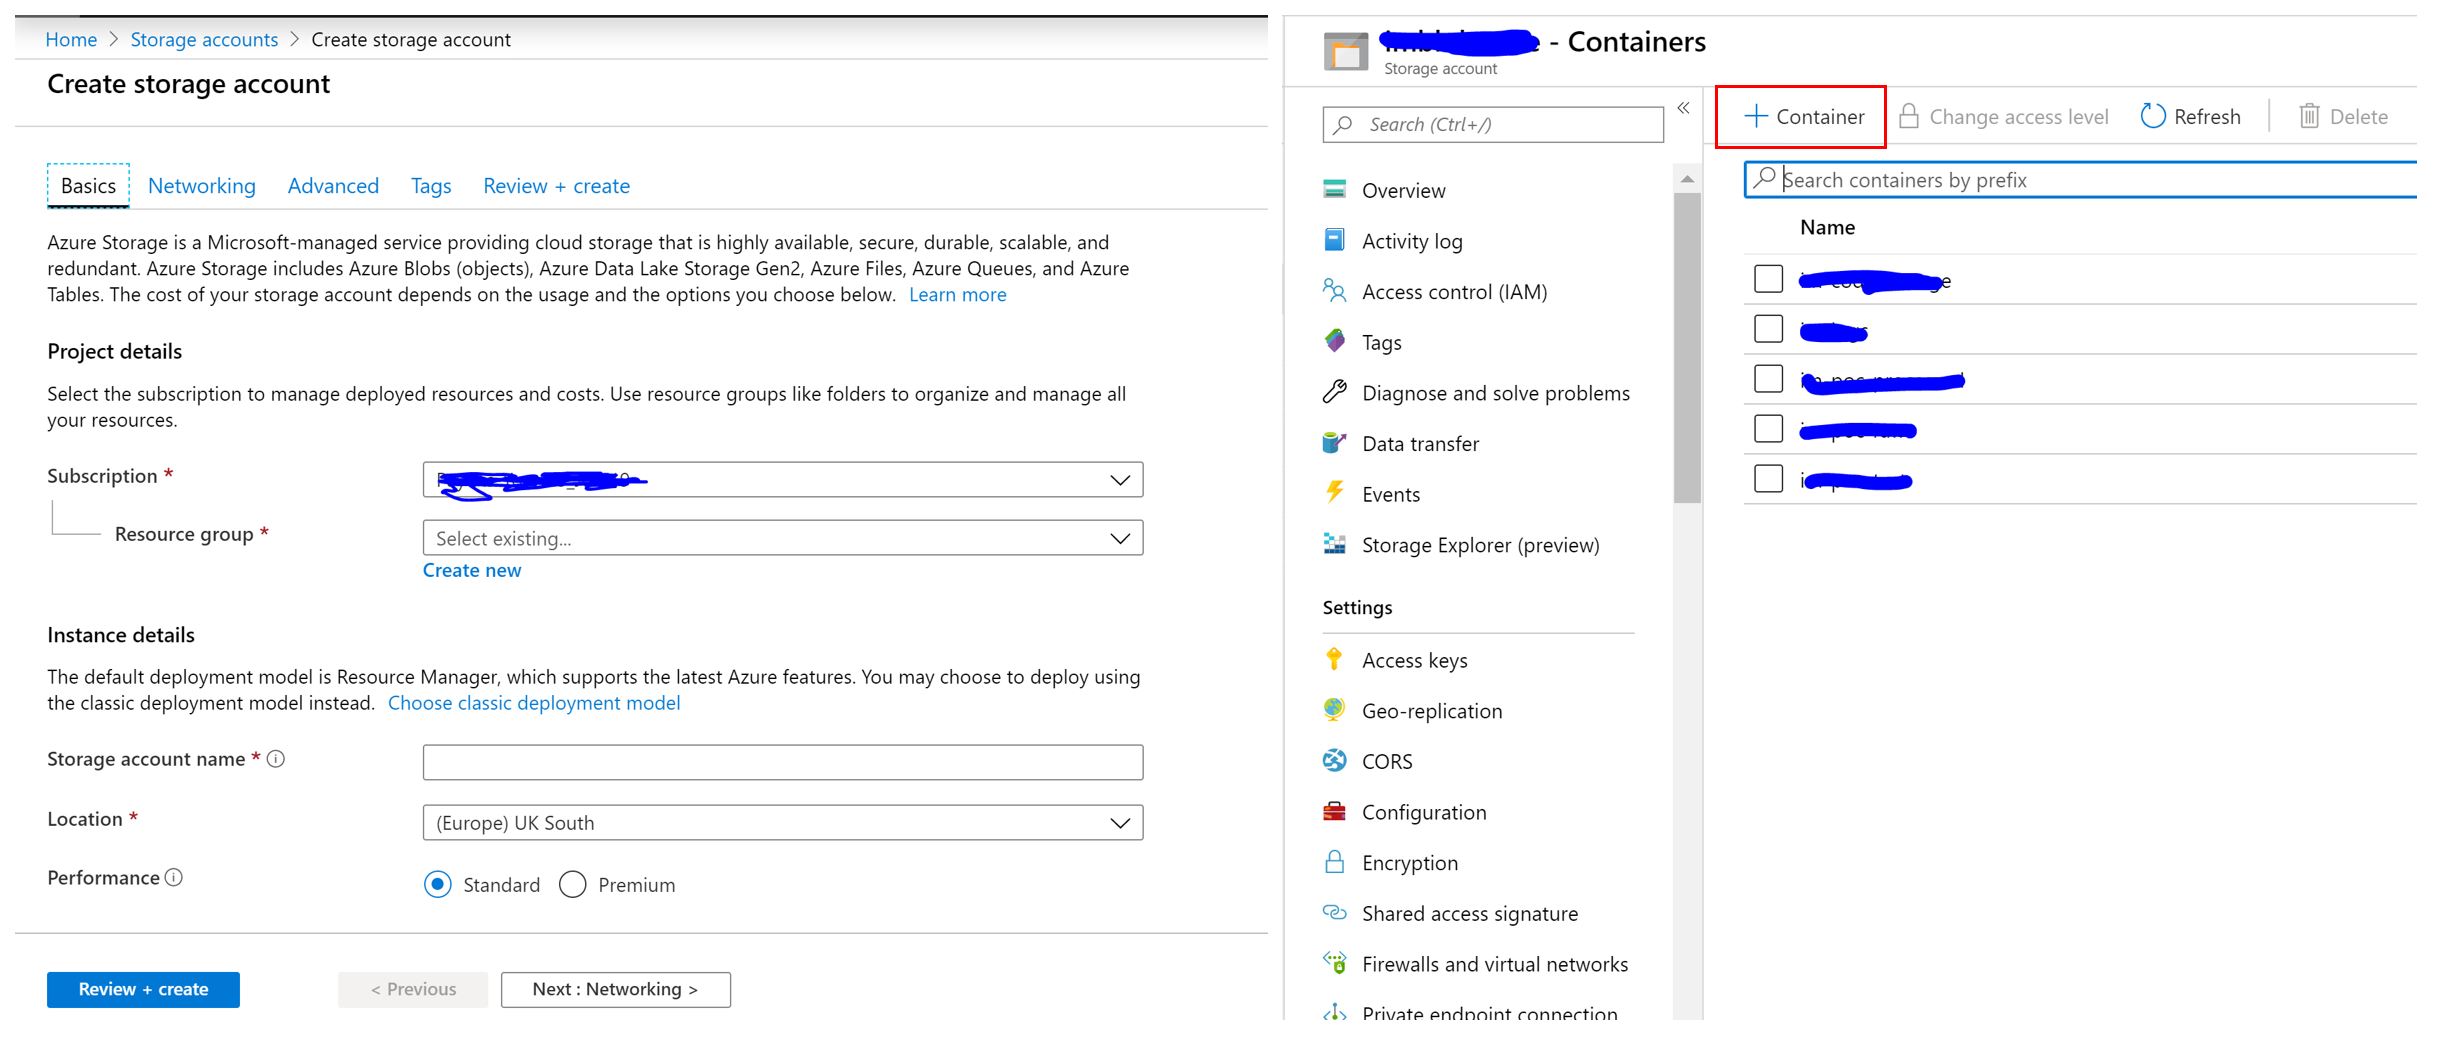
Equally this can be done using the azure portal, which can be a bit more user friendly to anyone who’s just starting out with Azure. An example of this is shown below for blob stores. In this case you just provide the required information (subscription, resource group, name, security (add it to your already made VNET), type - go for storage V2, etc) to build a storage account. After this is made you can then add containers, which will hold your various data blobs.
Processing (ETL)
Now we have the data stores, security and resource group set up we can build the functions that will make up the various batch jobs. These jobs will be ran from Docker containers that are held in the azure container registry (though Dockerhub can also be used)
Interacting with blob stores and SQL stores
The first set of functions to build up are those that allow you to interact with your data stores, thus enabling you to pull and push data. In python this can be done via the Azure SDK, which has a variety of functions for interacting with azure components. In order to do this securely id recommend establishing a config file that pulls various environmental variables via the OS library, which can be stored in an Az key vault, which can then be imported into the main app file.
from azure.storage.blob import BlockBlobService

def pull_from_blob(container, file, output):

    blobService = BlockBlobService(
        account_name=config["ACCOUNT_NAME"],
        account_key=config["ACCOUNT_KEY"]
    )
    container_name = config[container]

    blobService = BlockBlobService(
        account_name=config["ACCOUNT_NAME"],
        account_key=config["ACCOUNT_KEY"]
    )

    blobService.get_blob_to_path(container_name, file, output)


def general_blob_output(file_ending, df, container):

    file_name = '{}.csv'.format(file_ending)

    df.to_csv("./{}".format(file_name), index = False)

    container_name = config[container]

    blobService = BlockBlobService(
    account_name= config["ACCOUNT_NAME"],
    account_key= config["ACCOUNT_KEY"]
    )

    blobService = BlockBlobService(
        account_name=config["ACCOUNT_NAME"],
        account_key=config["ACCOUNT_KEY"]
    )

    blobService.create_blob_from_path(container_name, file_name,
    "./{}".format(file_name))
In addition to blobs, I needed to build functions that could pull or push data from the SQL store, which was done using PyODBC rather than the Azure SDK. In order to perform these actions you must ensure that the supplied user has select and insert permissions on the database. Also, by converting the dataframe into tuples this allows the executemany function from PyODBC to be used, which can significantly reduce the upload time.
import pyodbc

def pull_from_sql(SQL, filename):

    sqlconn = pyodbc.connect(DRIVER ='{ODBC Driver 17 for SQL Server}',
                        SERVER = config["SERVER"],
                        DATABASE = config["DB"],
                        UID = config["EXPORT_USER"],
                        PWD = config["EXPORT_PASS"])

    pd.read_sql(sql= SQL, con= sqlconn) \
    .to_csv("./{}".format(filename), index=False)

    sqlconn.close()


def create_sql_conn():

    sqlconn = pyodbc.connect(DRIVER ='{ODBC Driver 17 for SQL Server}',
                        SERVER = config["SERVER"],
                        DATABASE = config["DB"],
                        UID = config["IMPORT_USER"],
                        PWD = config["IMPORT_PASS"])

    return sqlconn


def table_to_sql(conn, df, table):

    date_filter = (date.today() - timedelta(days = 1)).strftime('%d/%m/%Y')

    df = df.loc[df["Date"] == date_filter]

    df.loc[:, "Date"] = pd.to_datetime(df["Date"], dayfirst = True).dt.strftime('%Y-%m-%d')

    df = df.replace({pd.np.nan: None})

    tup = list(df.itertuples(index=False, name=None))

    sql = "INSERT INTO dbo." + table + " values (" + "?," * (len(df.columns) -1)  + " ?)"

    cursor = conn.cursor()

    cursor.executemany(sql, tup)
    conn.commit()

    cursor.close()

    sqlconn.close()
Pulling and manipulating data
Since this section is rather contextual I’ll make it short. As such I’ve only included a couple of example functions below for how you might choose to pull data from an API using the requests library and how you may choose to manipulate it via pandas. For the first part of this process we needed to calculate set days as parameters, feed this into a query string and then request the data from the API, which was then stored as a dataframe and outputted as a CSV via the blob function from the previous section.
def get_dates():
    today = date.today().weekday()

    a = today - 0
    b = today - 4

    start_date = str((date.today() - timedelta(days = a)) - timedelta(days = 7))

    end_date = str((date.today() - timedelta(days = b)))

    return start_date, end_date


def create_req_list(codes, start_date, end_date):
    key = config['EOD_API_KEY']
    url = config['EOD_URL']
    reqs = []
    for i in codes:
        a = url + i + "?from=" + start_date + "&to=" + end_date + "&api_token=" + key + "&fmt=json"
        reqs.append(a)
    return reqs


def data_pull(requests, codes):
    data_json = []
    for i, j in zip(requests, codes):
        response = req.get(i)
        if response.status_code == 200:
            req_text = response.json()
            if len(req_text) > 0:
                req_text = req_text[0]
                a = req_text.get("a", req_text["b"])
                dict = {"A" : j, "B" : a}
                data_json.append(dict)

            else:
                dict = {"A" : j, , "B" : "NA"}
                data_json.append(dict)

        else:
            dict = {"A" : j, , "B" : "NA"}
            data_json.append(dict)

    return data_json


def JSON_to_df(json_file):

    df = pd.DataFrame()

    for i in json_file:
        row = pd.DataFrame([i])
        df = df.append(row)

    return df
For the second part we needed to manipulate the data and calculate a number of measurements. This was conducted by first melting a wide dataframe into a long one via pandas, and then filtering this data and calculating the required metric.
def melt_raw_data(df):

    df_raw = df_raw.iloc[:, np.r_[0, 6:len(df_raw.columns)]]

    # Extract date labels
    date_labels = [col for col in df_raw if '/20' in col]

    #Reshape price data to long format
    df_long = pd.melt(df_raw, id_vars=['A'], var_name = 'Date', value_name = 'B')

    df_long =df_long.drop_duplicates()

    return df_long, date_labels


def ten_week_av(df, period, date_labels):

    ten_week_current = df[df['Date'].isin(date_labels[-1*period:])]
    ten_week_current = ten_week_current.groupby('A').agg(np.nanmean)

    ten_week_current.reset_index(drop = False, inplace = True)
    ten_week_current.rename(columns={'B': 'Av'}, inplace=True)

    return ten_week_current
Scheduling the ETL process
Now that we have the base components and some actual functions established, the next thing to do is schedule each part of the ETL process. Doing this with azure batch components is relatively easy using batch shipyard, an official Azure add on for batch which allows you to build up jobs through YAML files, similar again to cloudformation. These jobs can be scheduled and allow for options that remove batch pools and jobs upon completion, allowing you to only pay for resources when required.

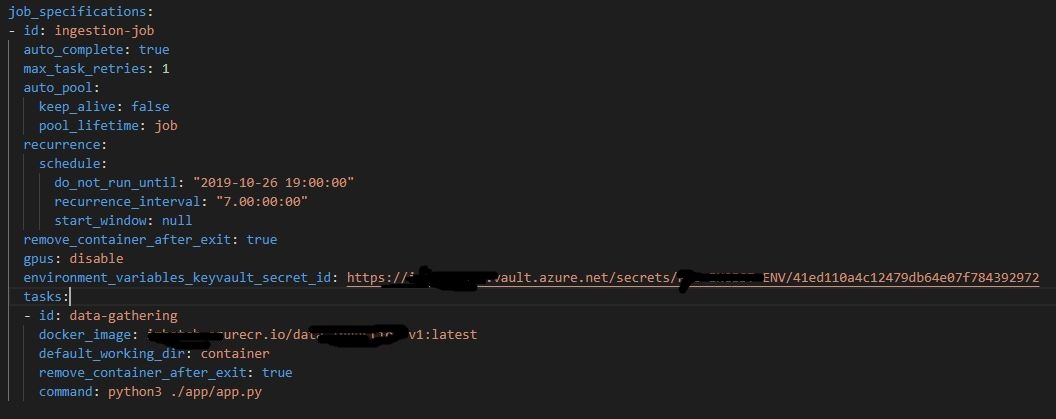
Shown below is an example of one of the four YAML files that need completing to schedule a batch job. These files encompass the credentials required to access your Azure subscription, the config for the pool, the pool setting and the job settings. With regards to scheduling, the important aspects can be found in the job settings file, where you can set the pool lifetime and job recurrence.
When starting out I’d recommend following the very in depth docs (https://batch-shipyard.readthedocs.io/en/latest/00-introduction/) in order to both access the infrastructure and get help in building up the files. Once they’re complete you then launch the batch processes via the command line.
Part 4: Setting it free
Once all the pieces are in place setting it loose is somewhat simple. As mentioned previously, using batch shipyard to build each batch job allows them to be scheduled using a chron trigger, meaning that the ETL process will run over the weekend each week. As such the only manual piece of the puzzle now is refreshing the dashboard on a Monday morning to access the new data!
And there it is, a quick dive into building an ETL job in azure! The process overall was fun, with Azure actually having some fairly comprehensive docs on the SDK and the components, and the batch shipyard team being very responsive to my silly questions around scheduling!
Also, some of you may notice that even in this simplistic rendition, parts around tracking data quality are missing. However, I can assure you they were included within the actual build through both aspects of the dashboard and additional batch processes!